-
HIT:614
1. go to setting->local->download config
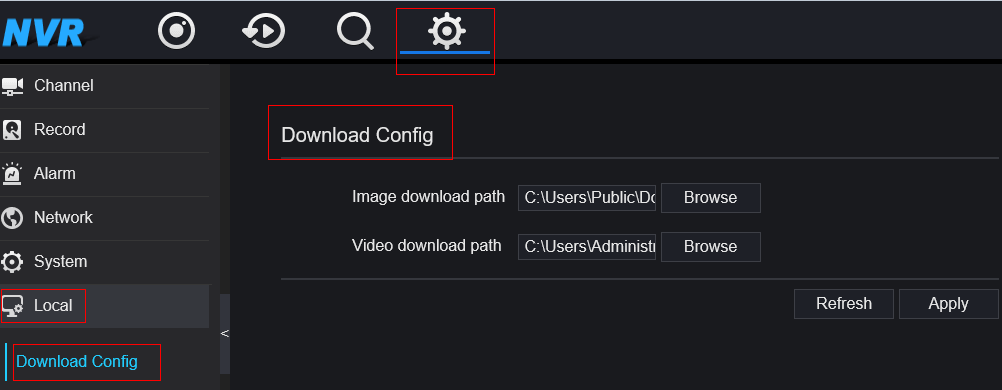
2. the set the paths here.
-
2019-11-25
HIT:643
To avoid password loss, here are three functions in Security Center:
1. Password

2. Secure Email
Password: it's the login password
E-mail: available Email

3. Secure Question
Password: it's the login password

-
HIT:621
1. Go to the Playback menu on the device’s GUI. It can be found on the task bar at the bottom of the screen when on live view.

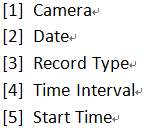
2. On Time Search, select the specific recording that you want to back up. Select your preferred:
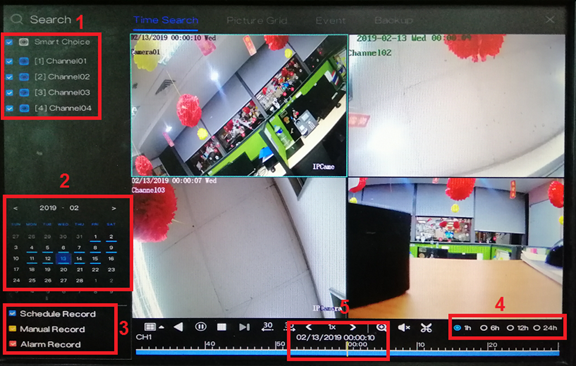
3. After selecting the specific time, click the
 icon (Start Backup) to start the backup process.
4. Drag the timeline to until when you would like to back up the recordings. The yellow bar indicates the timeframe of the recording that you will be downloading.

5. After selecting the specific timeframe of recording, click the

 (End Backup) icon to save the recording.
6. There will be pop-up message regarding the backup information and an option to save. Click Save to proceed.
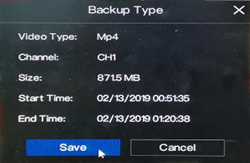
7. Select the specific folder in the USB flash drive directory and then click OK.
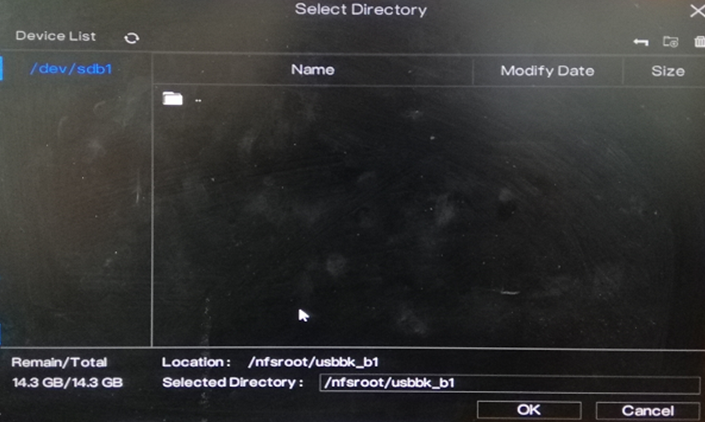
8. You can view the backup status in the Backup menu.

-
HIT:723
1. Enter the IP address of your NVR on the IE Tab’s address bar. You may now log in to your device using Chrome

2. After clicking ‘Allow…’, you will be prompted with another message as shown below. Select ‘Allow and Remember’.
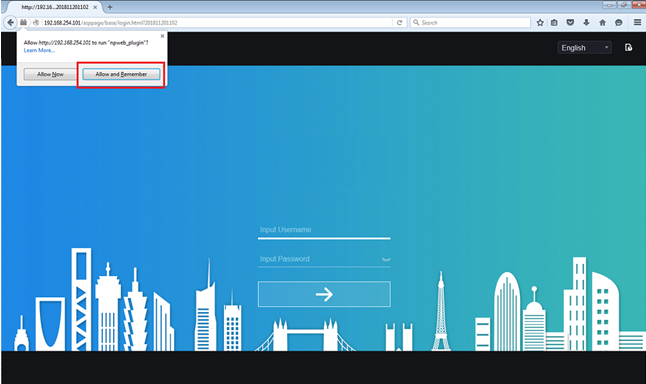
3. You may now log in to your device.

-
HIT:610
1. Click the right mouse button and select General under Alarm.
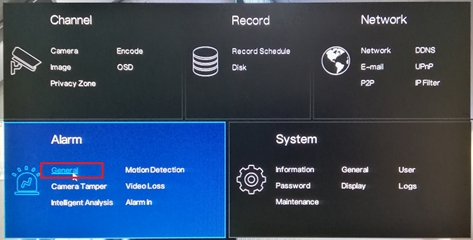
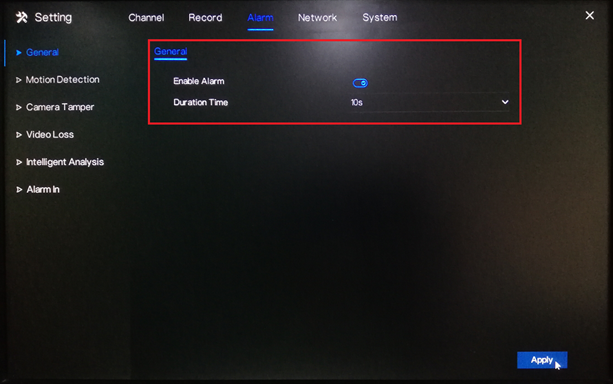
2. Turn on the Enable Alarm option and select a Duration Time from the drop-down list. Click Apply to save the settings.
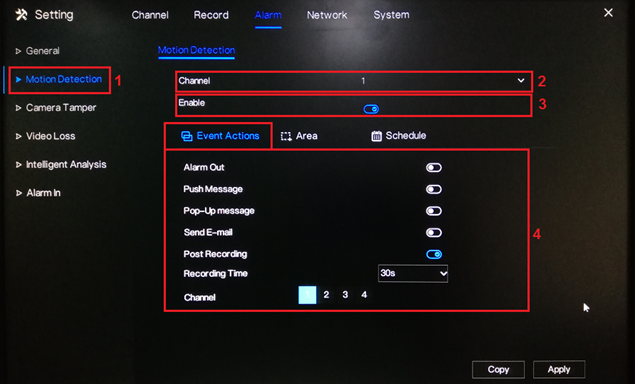
3. Go to Motion Detection. Under Channel, select a specific channel you would like to set the motion detection recording. Turn on the Enable option.
Under Event Actions, turn on the specific action you would like to have if there is a motion detected by the device. To ensure that the device will record when there is a motion detected; don’t forget to turn on Post Recording, select a Recording Time and select the corresponding channel under Channel.
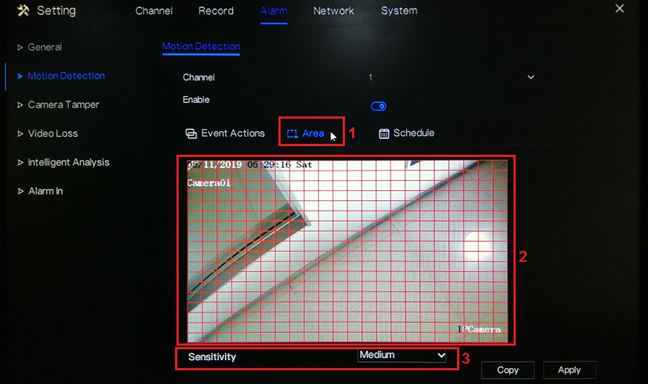
4. To configure the motion area and sensitivity, go to Area.
On the live preview on the page, you may select the motion area. Click the left mouse button on the live preview and drag the mouse on the specific area that you would like to set. The red grids represent the area that you have selected. To clear the area, just perform a double-click action using the left mouse button.
Select a Sensitivity option from the drop-down list. You may select from Low, Medium, High and Highest.
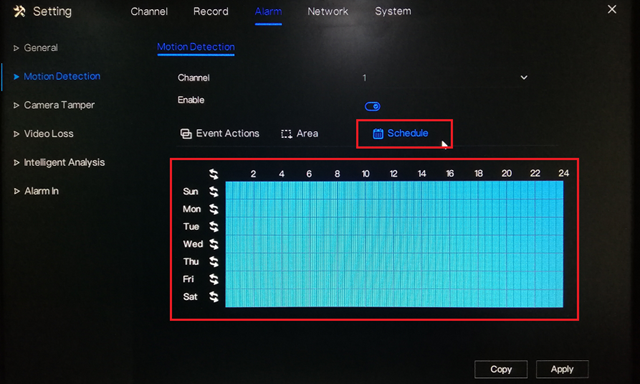
5. Under the Schedule setting, select the specific day and time that you would like to detect the motion. Use the left mouse button to select a specific box. You may also hold down and drag the left mouse button to select a wider schedule. To select all the boxes (24/7 by motion recording), just click the icon on the upper left corner. You may also click the same icon to clear the schedule.
6. Click Apply to save the settings.
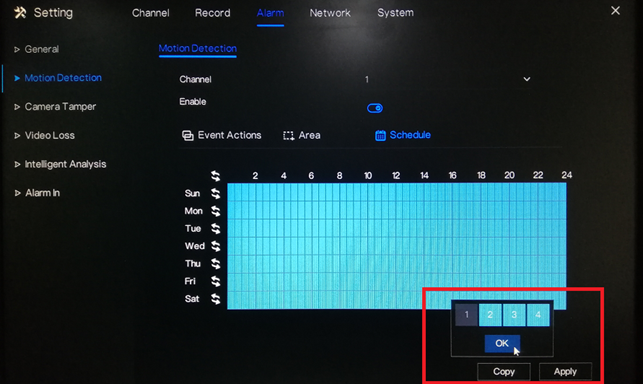
7. If you would like to copy the motion detection settings to the other channels, click Copy and select the specific channel you would like to copy the setting. Click OK then Apply to save the changes.
-
HIT:713
1. Go to the Playback menu on the device’s GUI. It can be found on the task bar at the bottom of the screen when on live view.
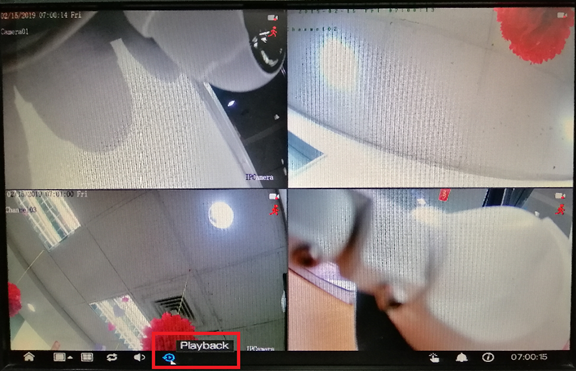
2. On Time Search, select the specific recording that you want to back up. Select your preferred:
Camera,Date,Record Type,Time Interval,Start Time
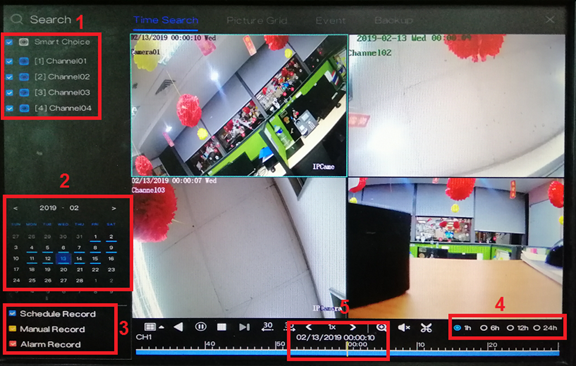
3. After selecting the specific time, click the
 icon (Start Backup) to start the backup process.
4. Drag the timeline to until when you would like to back up the recordings. The yellow bar indicates the timeframe of the recording that you will be downloading.

5. After selecting the specific timeframe of recording, click the
 (End Backup) icon to save the recording.
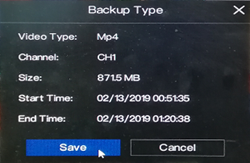
6. There will be pop-up message regarding the backup information and an option to save. Click Save to proceed.
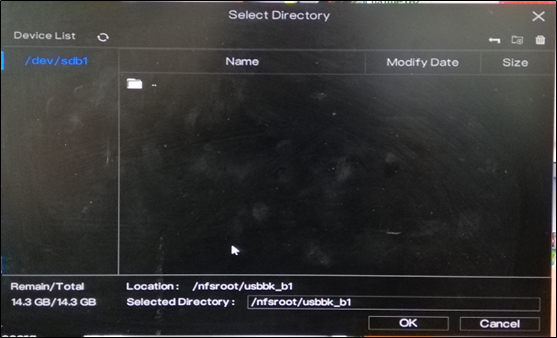
7. Select the specific folder in the USB flash drive directory and then click OK.
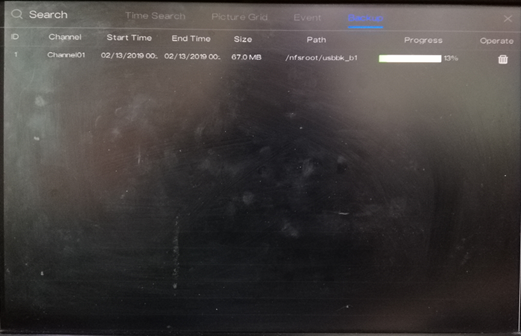
8. You can view the backup status in the Backup menu.
-
HIT:732
1. Download and install the correct application
2. Ensure that the device is connected to a network and the status is ‘Online’. You can find this information in Setting > Network > P2P
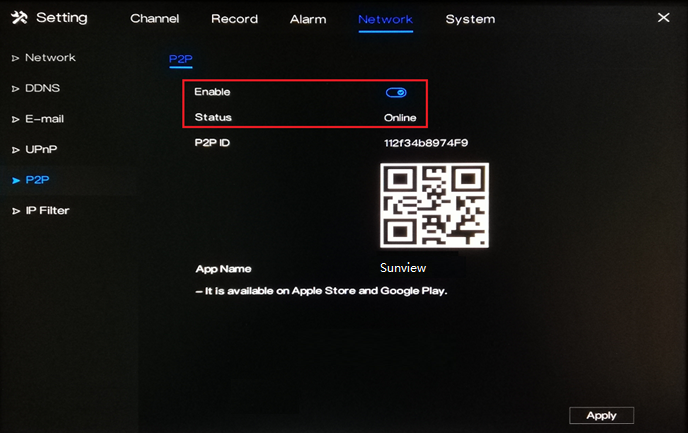
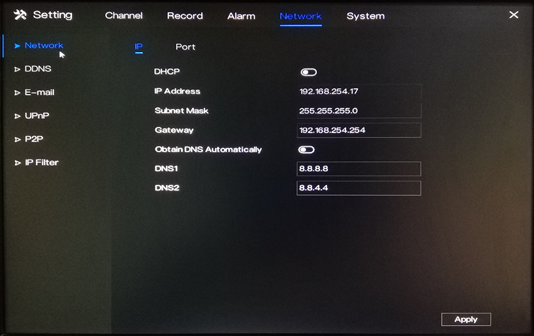
3. To ensure that the device is connected to the network properly, one example in below.
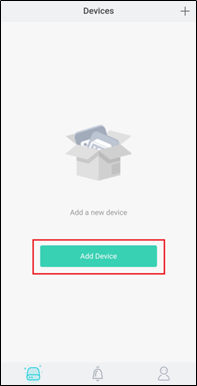
4.Open the app on your mobile phone. Click Add Device
5. Tap P2P Device and then scan the QR code that is shown on your device’s interface. The QR code is located in Setting > Network > P2P.
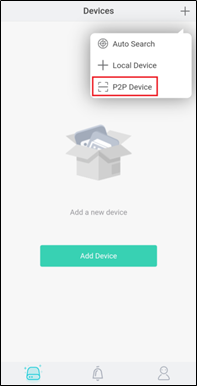
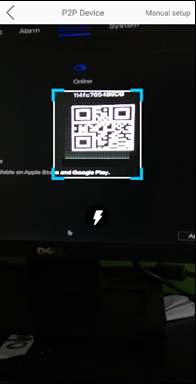
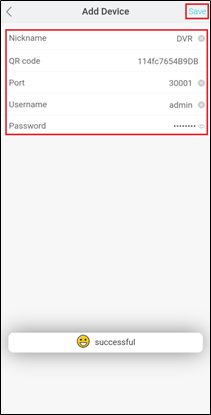
6. Input the needed information on the app.
1) Enter a Nickname.
2) In the Port field, input the Client Port indicated in the device setting. This information can be found in Setting > Network > Network > Port.
Please note: The default value of the Client Port is 30001. If you changed it to a different number, please make sure to input the new port number in the app.
3) Enter the Username and Password of the device.
4) Hit Save at the upper right corner to the save the information.
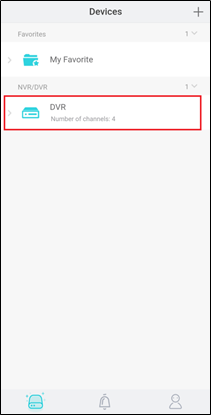
-
HIT:843
1.Download and install the correct application
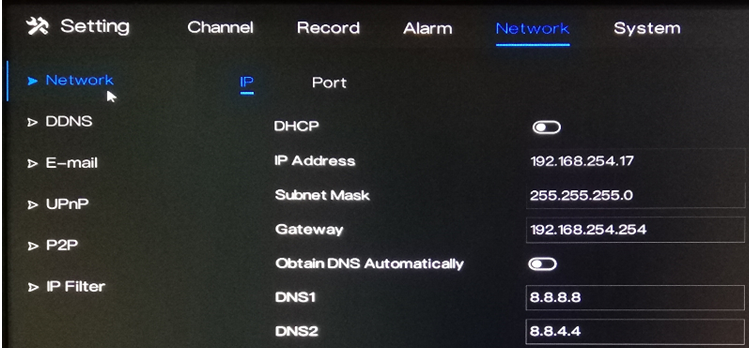
2.Ensure that the device is connected to the network properly. Check if the device’s network setting is set up correctly. You can find this in Setting > Network > Network > IP.
1)The device’s IP Address should be in the same range as the router’s gateway.
2)Subnet Mask should be same as what is indicated in the router’s network setting.
3)The Gateway should the router’s gateway or local IP address.
4)DNS 1 and DNS 2 can be your router’s DNS servers or you can use 8.8.8.8 and 8.8.4.4.
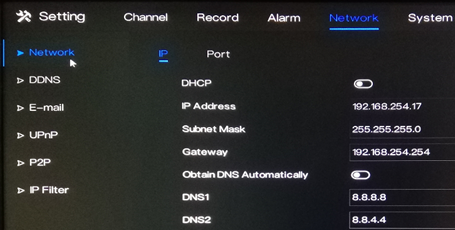
3. If you would like to use DDNS in adding the device to the app, please enable the DDNS first.Go to 1)Setting > Network > DDNS.
2)Click the toggle switch to Enable DDNS.
3)Choose one protocol.
4)Input a Domain Name inside the box.
4. If you would like to access the device remotely via WAN (external/public) IP or DDNS address using your mobile phone, you have to open/forward the Client Port of your device.
1)The Client Port can be found in Setting > Network > Network > Port.
2)The default value is 30001. If you changed this to a different number, please open/forward the new port number.
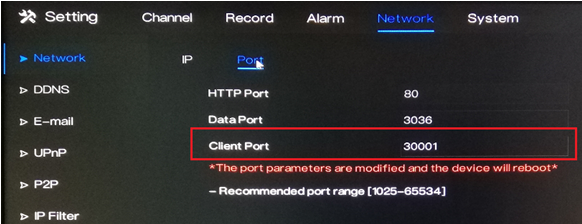
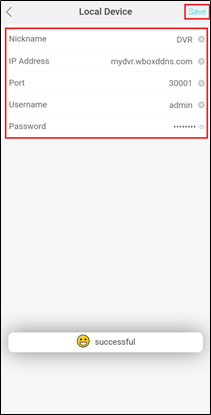
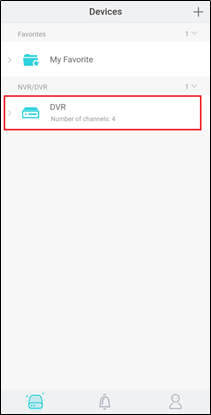
5. Open the app on your mobile phone. Click Add Device. Tap + Local Device.
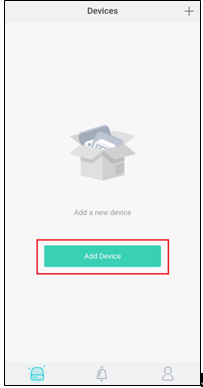
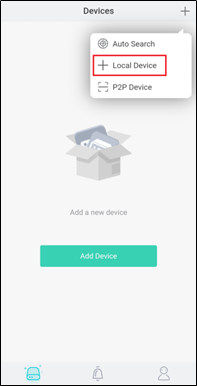
6. Input the needed information on the app.
1)Enter a Nickname.
2)In the IP Address field, enter the local IP address, WAN (external/public) IP address or the DDNS address of the device.
3)In the Port field, input the Client Port indicated in the device setting. This information can be found in Setting > Network > Network > Port.
note:The default value of the Client Port is 30001. If you changed it to a different number, please make sure to input the new port number in the app.
4)Enter the Username and Password of the device.
5)Hit Save at the upper right corner to the save the information.
-
HIT:708
Firmware Version: V4.2.XXXX.0000.XXX.X.XX.X.X
1. Ensure that the device is connected to the network properly.
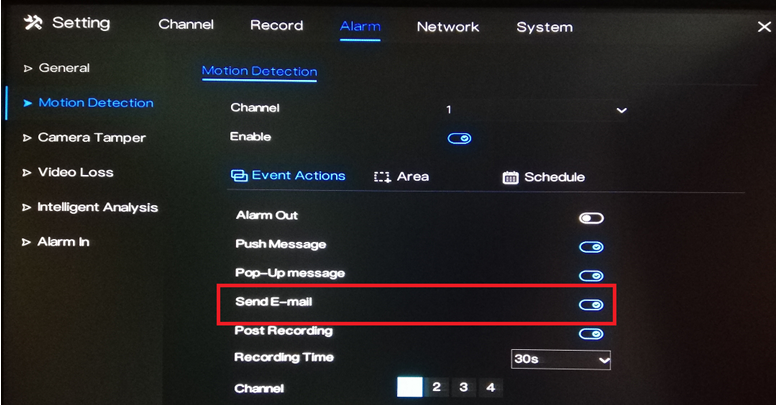
2. Make sure that the alarm settings are properly set up and Send E-mail option is enabled. Alarm e-mail notification can be enabled for Motion detection, video loss or camera tamper.
Motion Detection – Setting > Alarm > Motion Detection > Event Actions > Send E-email
Camera Tamper – Setting > Alarm > Camera Tamper > Event Actions > Send E-email
Video Loss – Setting > Alarm > Video Loss > Event Actions > Send E-email
Intelligent Analysis – Setting > Alarm > Intelligent Analysis > Event Actions > Send E-email
3. Go to Setting > Network > E-mail.
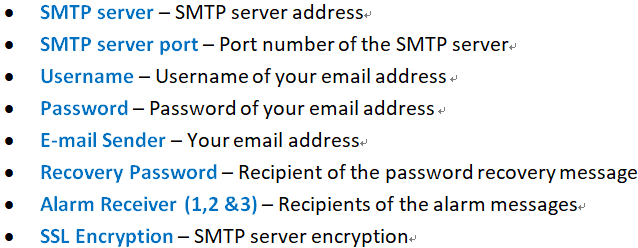
4. Input the correct SMTP setting of your account.
5. Click Test to test if the information you input are correct.

6. Check your e-mail account to see if you received the test message. If test e-mail was received successfully, click Apply to save the settings.
-
HIT:644
it’s the theoretical value
The capacity of storage space should be calculated according to the days, bit rate and type
1.Bit rate: 2Mb (for example)
channel and time
Disk space required
1 channel for 1 hour
2048Kb/8Byte*3600sec*=921600KB=900MB
1 channel for 1 day
900MB*24=21600MB≈21.09GB
1 channel for 30 days
21.09GB*30≈632.81GB
16 channel for 30days
632.81GB*16≈10125GB≈9.89TB
1.Bit rate: 4Mb (for example)
channel and time
Disk space required
1 channel for 1 hour
4096Kb/8Byte*3600sec*=1843200KB=1800MB
1 channel for 1 day
1800MB*24=43200MB≈42.19GB
1 channel for 30 days
42.19GB*30≈1265.7GB
16 channel for 30days
1265.7GB*16≈20251.2GB≈19.78TB
2.Bit rate: 6Mb (for example)
channel and time
Disk space required
1 channel for 1 hour
6144Kb/8Byte*3600sec*=921600KB=2700MB
1 channel for 1 day
2700MB*24=64800MB≈63.28GB
1 channel for 30 days
63.28GB*30≈1898.43GB
16 channel for 30days
1898.43GB*16≈30375GB≈29.66TB
Note:these tables are only for reference, and the actual values have the redundant.
-
What s full duplex and half duplex?
2019-04-26HIT:704
Full duplex :
Data communication allows data to be transmitted in both directions simultaneously. Like the switch or telephone, The network card can also receive data while transmitting data, and the two are synchronized.
Half duplex:
Data transmission allows data to be transmitted in both directions, but at a certain time, only data is allowed to be transmitted in one direction。 like Walkie-talkie
-
HIT:724
YES, it can be done like this.
However, 265 encoded video can only be realized when accessing the H.265 camera, saving space. If the H.264 camera is connected, this function cannot be realized.
