-
How to set PTZ tour on the web?
2019-12-23HIT:16219
1. open PTZ control panel

2. Select an area with the mouse ,and Set preset ID:1 Name: area1, then click "+"

3. Select an area with the mouse again ,and Set preset ID:2 Name: area2 ,then click"+"

4. go to "Tour", here show you how to add two preset points "area1 and area 2" to a tour:

1) select tour ID ,default is 1, tour name : enter a name
2)click
 to start
3)select "Preset”=area1, enter 5(sec) to "Wait Time", click "
 "
" 4)select "Preset”=area2, enter 5(sec) to "Wait Time", click "
 "
" note : you can add more preset points as you want.
5)click
 to end
 6) then you can click
 to check your setting for [Tour1]
-
HIT:624
1. For example , Open "Video Stream Draw Line" in Intelligent Analysis


2. set the related area


3. in the "Live Video" interface, select "stream2" in the Stream option. then you can see the Line

-
HIT:689
1. Login the IPC
2. Go to push Message->Configuration
3. Enable the option "Push Message"

-
2019-08-19
HIT:726
IEEE 802.1X is a standard to authenticate network clients (or ports) according to user ID or device. This process is called "port-level authentication". It uses RADIUS (Remote Authentication Dial-up User Service) method and divides it into three different groups: requester, authenticator and authorized server.
The 802.1X standard applies to terminal devices and users (requesters) attempting to connect to ports or other devices, such as Cisco Catalyst switches or Cisco Aironet series access points (authenticators). Authentication and authorization are implemented through back-end communication of authentication servers such as Cisco Secure ACS. IEEE 802.1X provides automatic user identification, centralized authentication, key management and LAN connection configuration. The whole 802.1x implementation design consists of three parts: requester system, authentication system and authentication server system.
In our IPC, you can see the setting: Network Service->802.1X
-
HIT:775
1. Check the IP is correct or not, use our ip search tool to find it.
2. Check the port is correct or not, our default port is 80, if the manager changed it , it may not be the default value. (default typing 192.168.0.120:80)
3. Check the "http" protocol has been changed to https, then you need to type https://192.168.0.120, but not http://192.168.0.120
4. Make sure the password is correct. The default account infor. is admin/admin
5. Make sure the network port hardware is working fine. it will flicker all the time.
-
HIT:819
1. In our IPC setting, you can see these these ports:

2. Explaination
Control Port: It is used for data transmission and the sunell's private connection protocol.
Http Port: It is used for accessing our IPCs via web interface. For example, type “http://192.168.0.120:80" to access one IPC .
RTSP Port: It is used for obtaining the video and audio stream resources. from the IPC.
-
How to open the HTTPS on the IPC?
2019-07-24HIT:829
1. Login the IPC
2. go to "Configuration"->"Device"->"System"->"Web Mode"
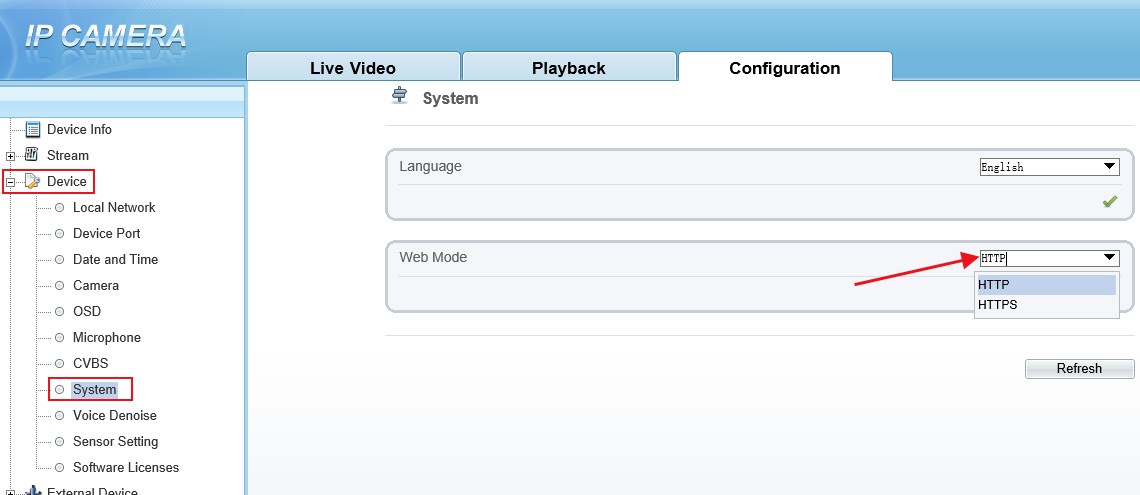
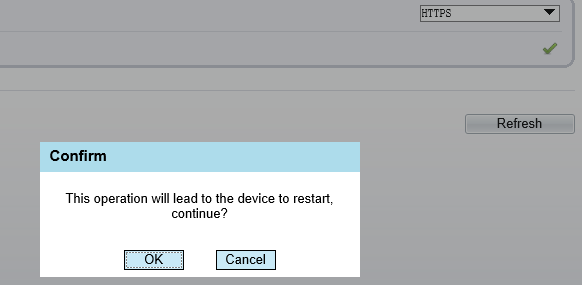
3. select HTTPS and click "
 " to confirm it
4. the IPC will restart
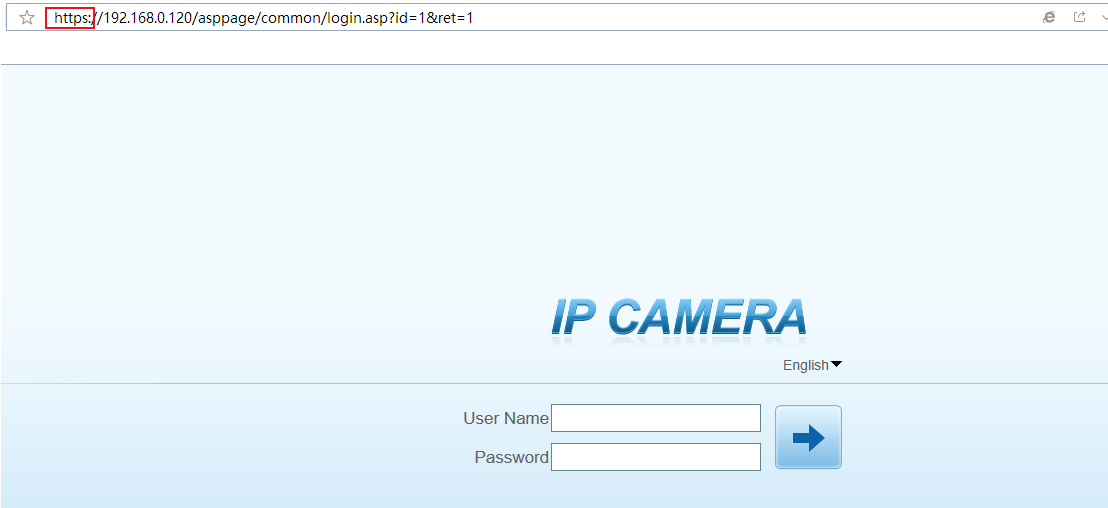
5. Then the new access address is : https://192.168.0.120 (for example)
-
HIT:852
1. Download a VLC video player from the App Store. Please note that the supported version is 2.2.6 or higher.
2. On VLC, click Media > Open Network Stream or Ctrl+N.
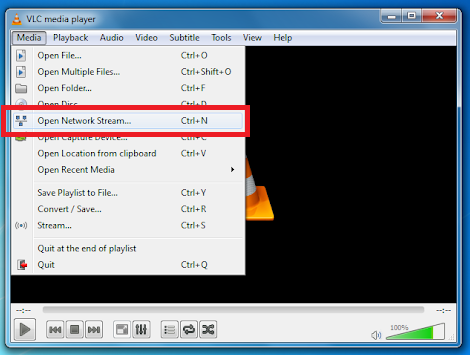
3. Go to Network tab and input the URL.
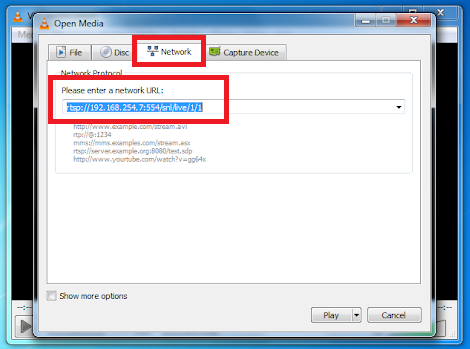
For IP Camera:
· URL Format – rtsp://<device IP>:554/snl/live/1/<Stream ID>
· Device IP: replace with the actual IP address of the device. Example: 192.168.0.120
· Stream ID: replace with 1, 2 or 3.
For NVR:
· URL Format – rtsp://<device IP>:554/snl/live/<channel ID>/<stream ID>
· Device IP: replace with the actual IP address of the device. Example: 192.168.0.121
· Channel ID: replace with the exact channel, for 4ch NVR, it can be 1, 2, 3 or 4.
· Stream ID: replace with 1, 2 or 3.
For DVR:
· URL Format – rtsp://<device IP>:3036/<channel ID>/1
· Device IP: replace with the actual IP address of the device. Example: 192.168.0.121
· Channel ID: replace with the exact channel, for 4ch DVR, it can be 1, 2, 3 or 4.
Note: 554 and 3036 are the default values of device. If you changed the port number 554 for IPC and NVR or 3036 for DVR, you should use the number you changed it to.
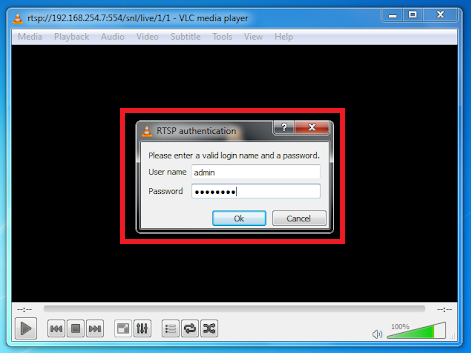
4. Enter the device’s username and password if the dialog box below pops up.
-
What can I do if my device got bricked?
2019-06-05HIT:788
1. On your computer, open the IP Search Tool. Checked if the tool can still find the device.
If the tool can still find the IP address of the device, proceed with updating the firmware.
2. If the IP Search Tool cannot find the IP address of the device, but you still remember the IP address of the device, try to ping the specific IP address. If IP address can still be pinged, proceed with updating the firmware.
3. If the device cannot be detected by the IP Search Tool and you don’t remember the IP address of the device, please try to ping the temporary IP address as listed below.
· IP Camera – 192.168.0.120
· NVR – 192.168.0.121
4. If the IP address can still be pinged, proceed with updating the firmware.
Notes:
1. Please ensure that the computer has the same IP range as the IP addresses listed above. For example, before you ping 192.168.0.120, set the computer’s IP address to 192.168.0.x.
2. It is highly recommended to connect the device directly to the computer to avoid any IP conflict.
3. After pinging timeout and the device can be pinged again, immediately click ‘Add’ and then ‘Update’ on the Update Tool. Please ensure to uncheck ‘add online device’.
-
2019-05-27
HIT:814
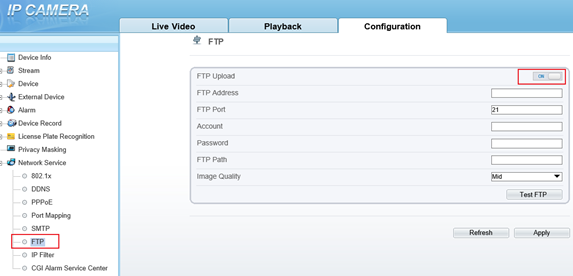
1.go to FTP setting interface, and start FTP, see in the belwo:
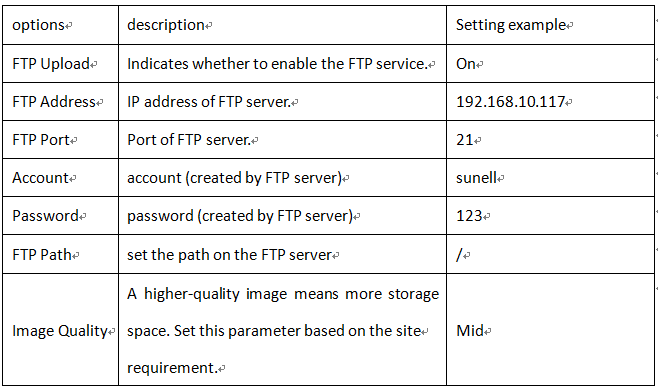
2.settings:
3.click “Test FTP”
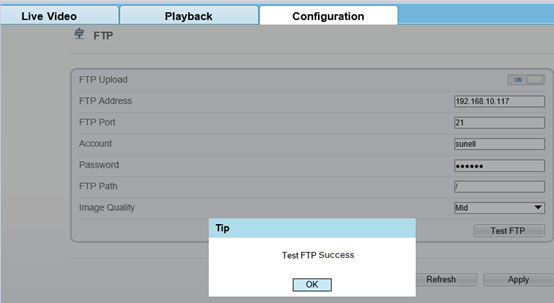
Note: please turn off the firewall and anti-viruse software before test FTP function.
-
2019-05-07
HIT:824
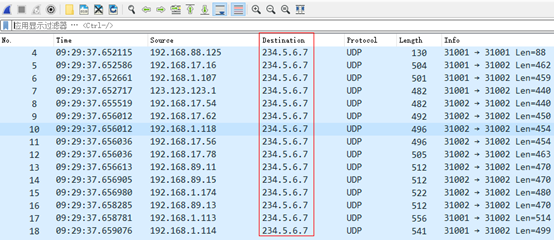
1. if you are using our sunell devices. Usually, you will see the packages like this :
2. what's the 234.5.6.7?
From the above address division, 234.5.6.7 belongs to the class D website, that is, the multicast address. It is a reserved address. It does not point to a specific network, and this type of address is currently used in multicasting. Multicast address is used to address a group of computers at a time, it identifies a group of computers sharing the same protocol
3. Packet information decomposition
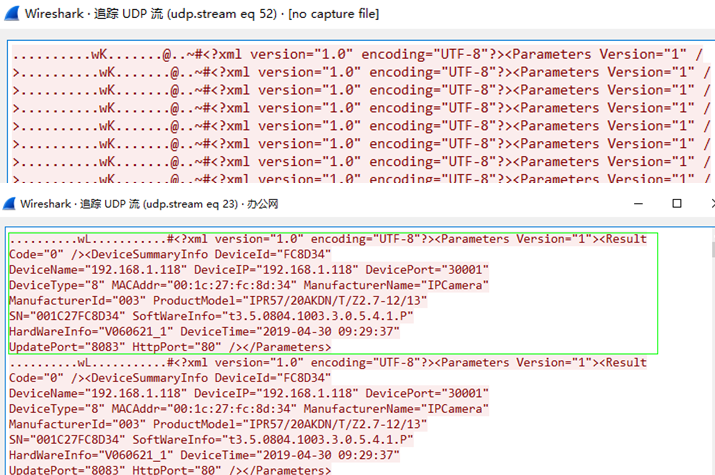
By tracking the UDP stream information, we can see the contents of each package, as shown below:
4. where does it comes from ?
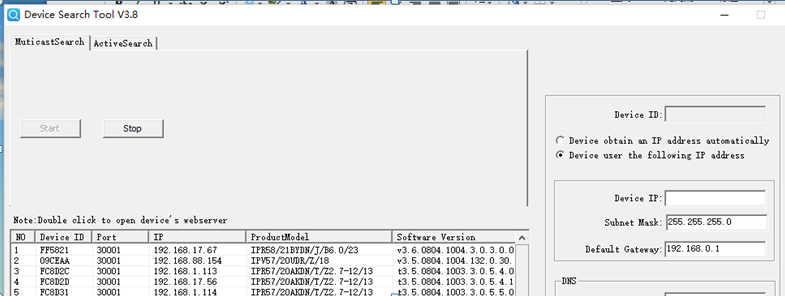
This 234.5.6.7 is a parameter set in our "IP Search Tool". Through this multicast address, all Jingyang machines can send information to the tool to display the product information on the search tool.
And this value is fixed in the tool, we can not see.
Of course, with this package, we can understand more clearly how IP search tools work, and it is also very good.
-
HIT:727
1. The main stream is the default stream and the stream of the large screen preview. The general value is large, which ensures the clarity of the video.
2. The sub-code stream is a code stream at the time of network transmission and multi-picture preview. Generally, the value is small, which can ensure the smoothness of network transmission, and can realize multi-picture preview locally.
